Move-In/Move-Out Inspections: Complete Guide with Photo Documentation
Property inspections are your #1 defense against security deposit disputes. A thorough move-in and move-out inspection protects both you and your tenant by creating an objective record of the property's condition. This guide shows you exactly how to conduct professional inspections that hold up in court.
Download our Free Move-In/Move-Out Inspection Checklist with photo documentation guide and security deposit deduction worksheet.
1 / Why Property Inspections Are Non-Negotiable
The numbers don't lie: 95% of security deposit disputes can be avoided with proper documentation. Yet many landlords skip this crucial step or rush through it, leading to headaches, lost money, and potential legal issues.
The Cost of Skipping Inspections
Without proper documentation:
- Average security deposit dispute: $1,200-2,500
- Small claims court filing fees: $50-250
- Time spent: 10-20 hours (court prep, appearance)
- Lost rent during dispute: $500-2,000/month
- Damage to landlord reputation: Priceless
With thorough inspections:
- Disputes: Rare (less than 5%)
- Win rate when disputes occur: 90%+
- Time investment: 30-45 minutes per inspection
- Cost: Free (or minimal for good camera)
Legal Protection
In many states, landlords must conduct and document move-in inspections to legally withhold security deposit funds for damage. Without this documentation, you may be forced to return the full deposit even if damage occurred.
2 / Move-In Inspection: Setting the Baseline
The move-in inspection establishes the property's condition at the start of tenancy. This is your baseline for comparison at move-out.
Timing is Critical
Best Practice: Schedule the move-in inspection 24-48 hours before the tenant takes possession.
Why?
- Property is empty and easy to inspect
- Tenant can see condition without their belongings
- Any issues can be addressed before move-in
- Creates clear baseline before tenant impact
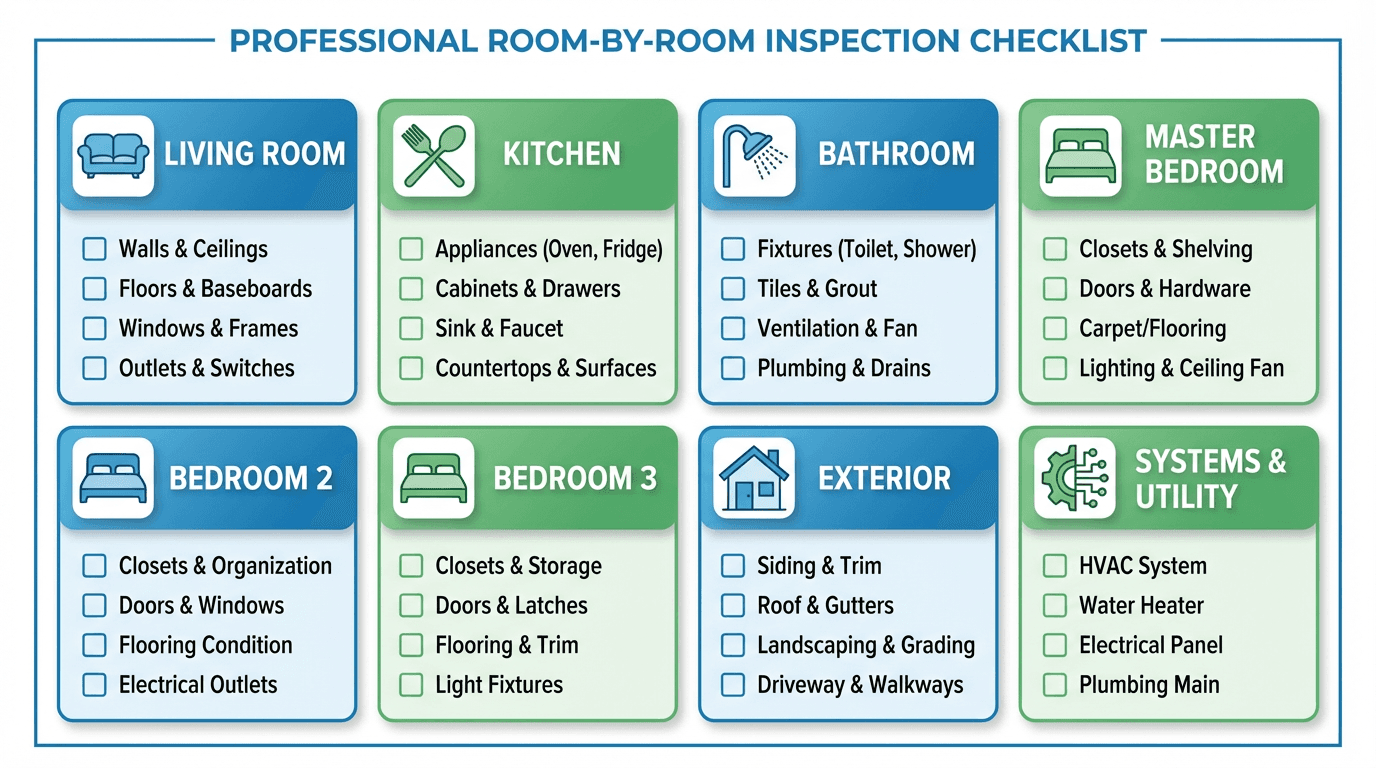
What to Inspect
Every Room:
- Walls (paint, holes, marks, texture)
- Ceilings (cracks, stains, water damage)
- Floors (carpet stains, hardwood scratches, tile cracks)
- Windows (glass, screens, locks, tracks)
- Doors (operation, locks, damage, alignment)
- Light fixtures and switches
- Electrical outlets
- Smoke and CO detectors
Kitchen:
- All appliances (test functionality)
- Cabinets (doors, shelves, hardware)
- Countertops (chips, cracks, stains)
- Sink and faucet (leaks, operation)
- Flooring
Bathrooms:
- Fixtures (sink, toilet, shower/tub)
- Grout and caulking condition
- Ventilation fan (test)
- Tile condition
- Plumbing (no leaks)
Systems:
- HVAC (heating and cooling work)
- Water heater (no leaks, proper temperature)
- Plumbing throughout (no visible leaks)
- All smoke detectors functional
- Carbon monoxide detectors functional
Exterior:
- Siding, paint, overall condition
- Roof (visible condition from ground)
- Gutters and downspouts
- Landscaping current state
- Driveway, walkways, fences
3 / Photo Documentation Strategy
Photos are your most powerful evidence. Here's how to do it right:
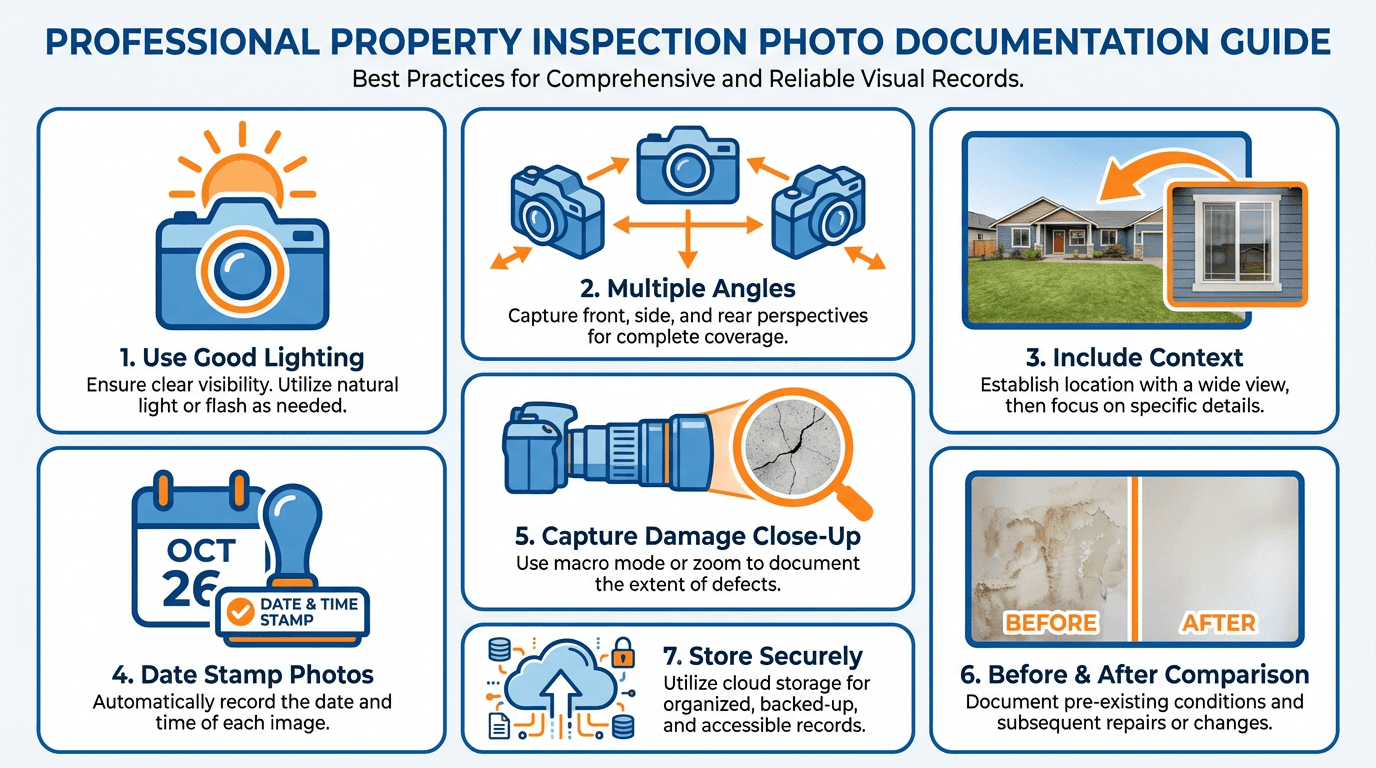
Essential Photography Rules
Rule 1: Take More Than You Think You Need
- Minimum: 100 photos for a 2-bedroom apartment
- Recommended: 150-200 photos for thorough documentation
- Why: You'll never regret having too many photos
Rule 2: Wide Shot + Close-Up
- Take a wide shot of each room showing overall condition
- Then take close-ups of specific features
- This provides context and detail
Rule 3: Document Everything Even if something is in perfect condition, photograph it. This proves its condition at move-in.
Room-by-Room Photo Checklist
Every Room (6-8 photos minimum):
- Wide shot from doorway
- Each wall individually
- Ceiling
- Floor/carpet (multiple angles)
- Windows (open and closed)
- Any defects or wear (close-up)
Kitchen (15-20 photos):
- All appliance exteriors and interiors
- Inside cabinets (showing shelf condition)
- Under sink (check for leaks)
- Stovetop, oven interior
- Refrigerator interior
- Countertops and backsplash
- Flooring from multiple angles
Bathrooms (12-15 photos per bathroom):
- Toilet (bowl, tank, base)
- Shower/tub (multiple angles)
- Grout and caulking close-ups
- Sink and vanity
- Mirror and fixtures
- Flooring (especially around toilet)
- Exhaust fan
Technical Tips
Camera Settings:
- Date stamp: Enable date/time stamp on camera
- High resolution: Use highest quality settings
- Natural light: Open blinds for accurate colors
- Flash carefully: Use for dark areas but avoid glare
Organization:
- Folder structure: Property Address > Date > Room Name
- Filename convention: "Property_Date_Room_Description.jpg"
- Backup immediately: Upload to cloud storage same day
- Multiple backups: Cloud + external drive + printed if possible
Mobile Apps for Inspections:
- Cascadium Documenting - Purpose-built for property inspections
- PropertyWare - Professional inspection tools
- Google Photos - Automatic date stamping and cloud backup
- Timestamp Camera Free - Adds date/time/GPS to photos
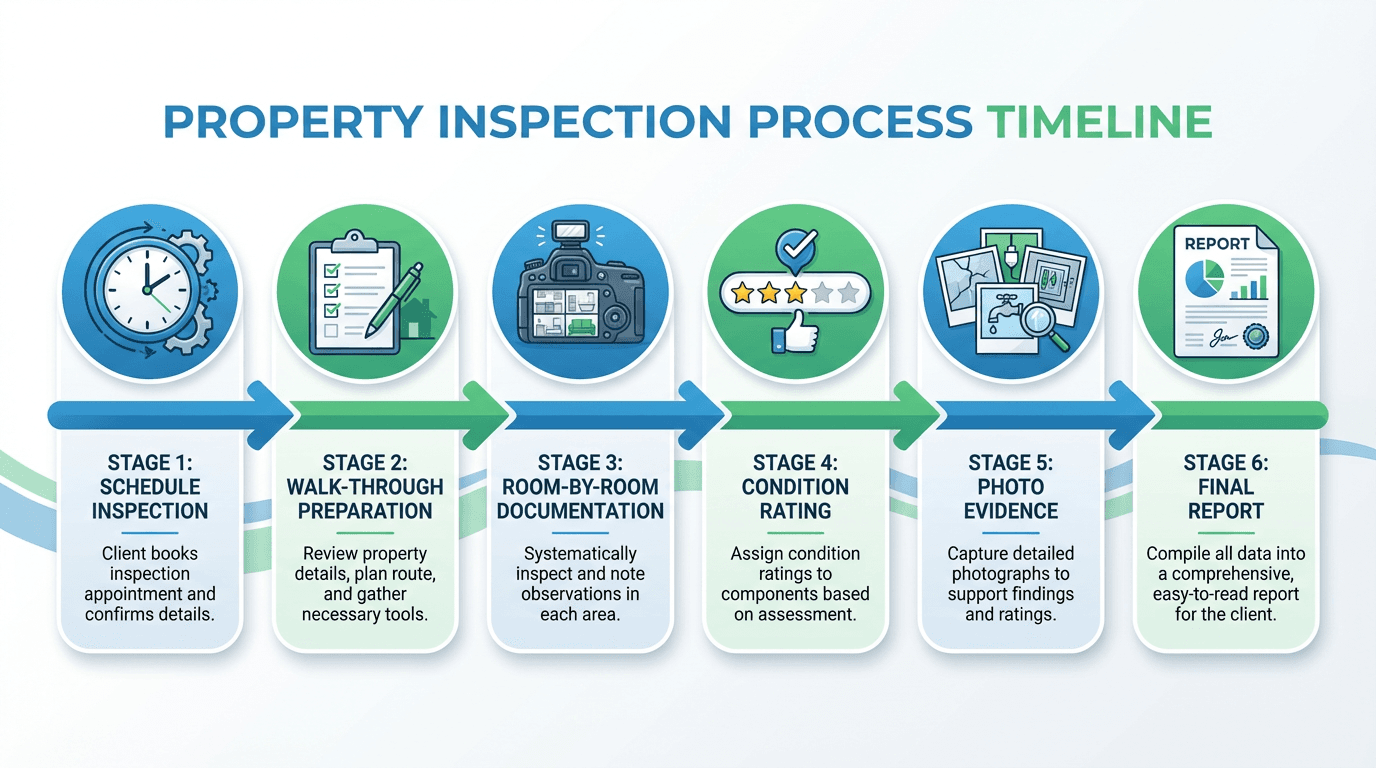
4 / Conducting the Inspection Walkthrough
Step-by-Step Process
1. Schedule Properly
- Give tenant 24-48 hours written notice
- Allow 1-2 hours for thorough inspection
- Choose time with good natural lighting (mid-morning best)
- Tenant should be present but not required
2. Come Prepared
- Printed inspection checklist
- Clipboard and pens
- Fully charged camera/smartphone
- Flashlight for dark areas
- Tape measure (for documenting damage size)
- Notepad for additional notes
3. Start at Front Door Work systematically through the property:
- Entry/foyer
- Living areas
- Kitchen
- Bedrooms (each separately)
- Bathrooms (each separately)
- Laundry area
- Garage/carport
- Exterior and landscaping
4. Use Consistent Rating System
We recommend this 5-point scale:
| Rating | Description | Example | |--------|-------------|---------| | E - Excellent | Like new, no wear | Recently painted walls | | G - Good | Minor wear, normal | Slight carpet wear in traffic areas | | F - Fair | Noticeable wear but functional | Faded paint, old but clean carpet | | P - Poor | Significant wear, needs attention soon | Heavily worn carpet, dinged walls | | D - Damaged | Non-functional or requires immediate repair | Broken fixture, large hole in wall |
5. Test Everything
- Turn on every light switch
- Test every electrical outlet (phone charger)
- Run water in every sink/tub/shower
- Flush every toilet
- Test all appliances
- Open and close all windows
- Lock and unlock all doors
- Test HVAC heating and cooling
- Push smoke detector test button
6. Note Pre-Existing Damage Be specific and detailed:
❌ Bad: "Bedroom carpet worn" ✅ Good: "Master bedroom carpet shows heavy wear in 3ft x 4ft area in front of closet. Two small stains near window (6 inches each). See photos 42-45."
❌ Bad: "Kitchen appliances work" ✅ Good: "All kitchen appliances tested and functional. Small dent on lower left refrigerator door (2in diameter). Oven interior shows normal baking residue. See photos 67-73."
7. Document Keys and Access Items
- Count and record all keys provided
- Test each key in its lock
- Note garage openers, gate fobs, mailbox keys
- Photograph keys if unique or numerous
5 / Getting Tenant Acknowledgment
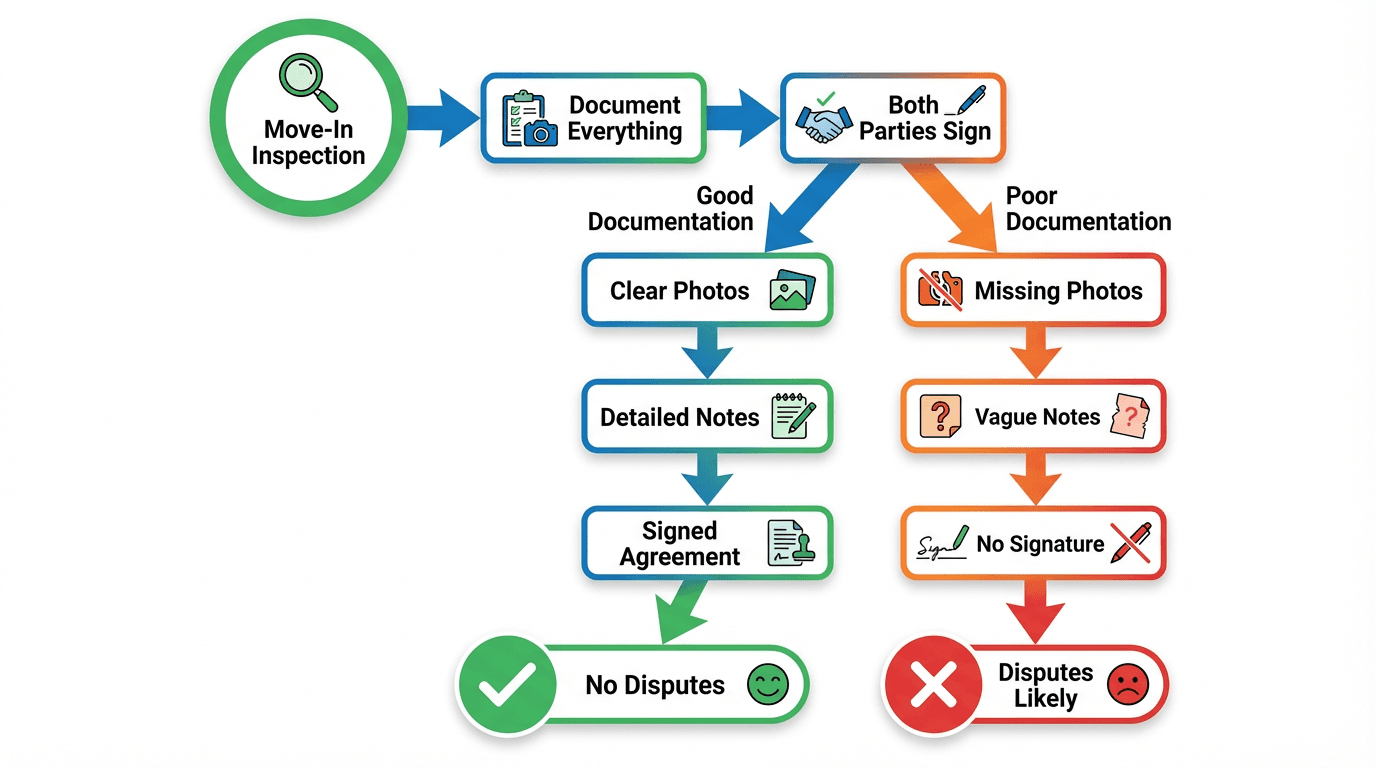
Critical: Tenant Signature Required
Your inspection documentation isn't complete without the tenant's acknowledgment.
Best Practices for Signatures
1. Review Together
- Walk through the completed inspection form with tenant
- Explain any noted damage or concerns
- Allow tenant to add notes or comments
- Address any disagreements immediately
2. Provide Copy Immediately
- Give tenant a complete copy before they leave
- Include one set of photos on CD/USB or via email
- Keep original signed copy for your records
3. Include Acknowledgment Statement
Standard language to include:
"I acknowledge that I have inspected the property located at [ADDRESS] and that this inspection report accurately reflects the condition of the property as of [DATE]. I understand that I am responsible for any damage beyond normal wear and tear that occurs during my tenancy."
4. Handle Disagreements If tenant disputes any findings:
- Take additional photos together
- Document tenant's specific concerns in writing
- Consider having both parties initial disputed items
- May need neutral third party for significant disputes
5. Digital Signatures
- Now legally acceptable in most states
- Use DocuSign, HelloSign, or Adobe Sign
- Include timestamp and IP address
- Email copy to tenant immediately
6 / Move-Out Inspection: The Comparison
The move-out inspection compares the property's current condition to the baseline established at move-in.
Timing Considerations
Option 1: Tenant Present (Recommended)
- Schedule after tenant vacates but before they turn in keys
- Allows tenant to address minor issues
- Reduces disputes dramatically
- Promotes good landlord-tenant relationship
Option 2: After Tenant Vacates
- Easier to inspect without tenant present
- More flexibility in scheduling
- Can be more thorough
- Higher risk of disputes
Best Practice: Offer tenant the option to be present, but don't require it.
Using Your Move-In Documentation
Side-by-Side Comparison:
- Open move-in photos on tablet/laptop
- Take new photos from same angles
- Note any changes in condition
- Distinguish between normal wear and damage
Normal Wear and Tear vs. Damage
This distinction is crucial for security deposit deductions.
Normal Wear and Tear (Cannot Deduct):
- Paint fading or minor scuffs
- Carpet wear in traffic areas
- Small nail holes for pictures
- Hardware tarnishing
- Caulking deterioration over time
- Minor scratches on floors
- Filter/screen wear
Damage Beyond Normal Wear (Can Deduct):
- Large holes in walls
- Pet damage (stains, scratches, odors)
- Broken fixtures or appliances
- Missing/damaged blinds
- Burns on countertops or carpet
- Broken windows or screens
- Excessive dirt requiring professional cleaning
- Damaged doors or cabinets
The Timeline Test: Generally, items that would need replacement within the normal wear and tear timeline cannot be fully charged to tenant:
- Carpet: 5-7 years
- Paint: 2-3 years
- Vinyl flooring: 10 years
- Appliances: 10-15 years
Cleaning Standards
Broom Clean (Minimum Standard):
- Swept floors
- Wiped counters and appliances
- Bathroom cleaned
- No trash or personal items left
Professional Clean (If Specified in Lease):
- Deep cleaned carpets
- Professional house cleaning
- Windows cleaned inside and out
- All appliances detailed
Document Cleaning Status: Take photos showing:
- Overall cleanliness level
- Any areas requiring professional cleaning
- Trash or items left behind
- State of appliances and fixtures
7 / Security Deposit Deductions
If you need to make deductions, thorough documentation is essential.
Legal Requirements
Most states require:
- Itemized list of all deductions
- Receipts or estimates for repairs
- Photos showing damage
- Delivery within deadline (typically 14-30 days)
- Return of remaining deposit with itemization
Creating Your Deduction Report
Include:
- Description of damage
- Location in property
- Cost to repair (with receipt or estimate)
- Reference to move-in condition
- Photos showing damage
Example:
Damage: Carpet stain removal - Living Room
Location: Center of living room, 3ft x 4ft area
Move-In Condition: Carpet rated "Good" - no stains (see photo #23)
Move-Out Condition: Dark brown stain, likely beverage (see photo #156)
Repair: Professional carpet cleaning - $150.00
Receipt: ABC Carpet Cleaning, Invoice #4521
Calculating Deductions
For Repairs: Charge actual cost of repair:
- Get itemized receipt from contractor
- Include labor and materials
- Reasonable and customary rates
For Replacements: Must pro-rate based on useful life:
- Item cost: $500
- Useful life: 5 years
- Age at damage: 2 years
- Remaining life: 3 years
- Deduction: $500 × (3/5) = $300
Example Calculation:
Carpet replacement needed due to pet damage:
- New carpet cost: $2,000
- Carpet age: 3 years
- Expected life: 7 years
- Remaining value: 4/7 = 57%
- Deduction: $2,000 × 0.57 = $1,140
Documentation to Include
Send to Tenant:
- Itemized deduction list
- Photos showing damage
- Receipts or written estimates
- Copy of original move-in inspection
- Check for remaining deposit (if any)
- Explanation of how amounts were calculated
8 / Common Inspection Mistakes
Mistake #1: Rushing the Process
Problem: Missed damage leads to disputes
Solution: Schedule sufficient time (1-2 hours minimum)
Mistake #2: Poor Lighting
Problem: Photos don't show damage clearly
Solution: Open all blinds, use flash carefully, inspect during daylight
Mistake #3: Vague Descriptions
Problem: "Needs cleaning" doesn't hold up in court
Solution: Specific descriptions: "Grease buildup on stovetop and range hood requiring professional degreasing"
Mistake #4: No Tenant Acknowledgment
Problem: Tenant claims damage existed at move-in
Solution: Get signature on inspection report at move-in
Mistake #5: Inconsistent Inspections
Problem: Move-out photos taken from different angles than move-in
Solution: Reference move-in photos during move-out, try to match angles
Mistake #6: Not Testing Everything
Problem: Tenant discovers issue after move-in, claims it existed
Solution: Test every switch, outlet, appliance, door, window during inspection
Mistake #7: Losing Documentation
Problem: Can't prove condition when dispute arises months later
Solution: Multiple backups (cloud + external drive), organized file system
Mistake #8: Ignoring Normal Wear and Tear
Problem: Illegal deductions, potential lawsuits
Solution: Learn and apply state-specific definitions of normal wear
9 / Digital Inspection Tools
Modern technology makes inspections easier and more professional.
Recommended Apps
1. Property Inspection Apps:
- Inspection Support Network (ISN)
- HomeGauge Inspector
- Spectora
- Easy Inspection Reports
Features:
- Pre-built room templates
- Photo attachment to specific items
- Automatic report generation
- Cloud storage and backup
- Digital signature capture
2. Photo Management Apps:
- Google Photos: Free, unlimited storage, automatic date organization
- Cascadium: Purpose-built for rental inspections
- CompanyCam: Timeline view, easy sharing with contractors
3. Document Management:
- DocuSign: Electronic signatures
- Adobe Sign: PDF forms and signatures
- Dropbox: Cloud storage and sharing
Creating Digital Workflow
Efficient Process:
- Pre-inspection: Create folder structure in cloud
- During inspection: Use inspection app or checklist app
- Photo management: Auto-upload to Google Photos
- Report generation: Use app or create in Google Docs
- Signature collection: DocuSign or in-person
- Distribution: Email PDF to tenant immediately
- Archive: Save to property folder with lease documents
10 / State-Specific Considerations
Inspection requirements and security deposit laws vary by state.
Key Differences by State
California:
- Must provide itemized statement within 21 days
- "Walk-through" inspection required (tenant can attend final inspection)
- Initial pre-move-out inspection must be offered
New York:
- No statutory requirement for move-in inspection
- Security deposit itemization required within 14 days
- Photos strongly recommended
Texas:
- Must provide itemized list within 30 days
- No specific inspection requirement
- Landlord must refund deposit or provide itemization
Florida:
- 15 days for notice of intention to claim deposit
- 30 days to return remaining deposit
- Move-in inspection not required but highly recommended
Illinois:
- 30-45 days to return deposit (depending on property size)
- Must provide itemized statement
- Photos must be taken within 72 hours of move-out
Research Your State Laws
Essential Questions:
- Is move-in inspection legally required?
- What timeline for security deposit return?
- What must be included in itemized deductions?
- Are there specific normal wear and tear definitions?
- What notice is required for move-out inspection?
Resources:
- Your state bar association website
- Department of Consumer Affairs
- Local landlord associations
- HUD.gov (federal fair housing)
Key Takeaways
✅ Conduct thorough move-in inspections to establish baseline condition
✅ Take 100+ photos minimum with good lighting and multiple angles
✅ Use consistent rating system (Excellent/Good/Fair/Poor/Damaged)
✅ Get tenant signature acknowledging property condition
✅ Provide copies to tenant immediately after inspection
✅ Test all appliances, fixtures, and systems during inspection
✅ Document everything even items in perfect condition
✅ Store photos securely with multiple backups in cloud storage
✅ Compare move-out to move-in using side-by-side photos
✅ Distinguish normal wear from damage per state definitions
✅ Itemize deductions properly with photos and receipts
✅ Follow state-specific timelines for security deposit returns
Next Steps
- Download our free inspection checklist at Move-In/Move-Out Inspection Template
- Review your state's laws regarding inspections and security deposits
- Set up digital workflow with cloud storage and backup system
- Schedule move-in inspection 24-48 hours before tenant occupancy
- Take 100+ photos documenting every aspect of property
- Get tenant signature and provide copy immediately
- File with lease documents for easy access at move-out
Proper inspections take time upfront but save countless hours and dollars in disputes. Make it a non-negotiable part of your tenant onboarding and offboarding process.
Ready to conduct professional property inspections? Download our complete inspection checklist with photo guide and start protecting your investment today.
Related Articles
- How to Screen Tenants: Complete Guide
- Lease Agreements: Complete Guide for Landlords
- How to Handle Problem Tenants
- Landlord-Tenant Laws by State
Related Resources
Related Content
📝 How to Raise Rent: Complete Guide with Professional Letter Templates
Raise rent professionally and legally. Includes 6 free letter templates and state-by-state notice requirements.
📝 Lease Violation Documentation System: Complete Template & Legal Guide
Read more about this topic
📝 1031 Exchange Calculator: Complete Tax-Deferred Real Estate Guide
Read more about this topic
🔧 ROI Calculator
Calculate return on investment
🔧 Property Investment Analyzer
Comprehensive property analysis tool
🔧 BRRRR Calculator
Analyze buy-rehab-rent-refinance deals